More Articles...
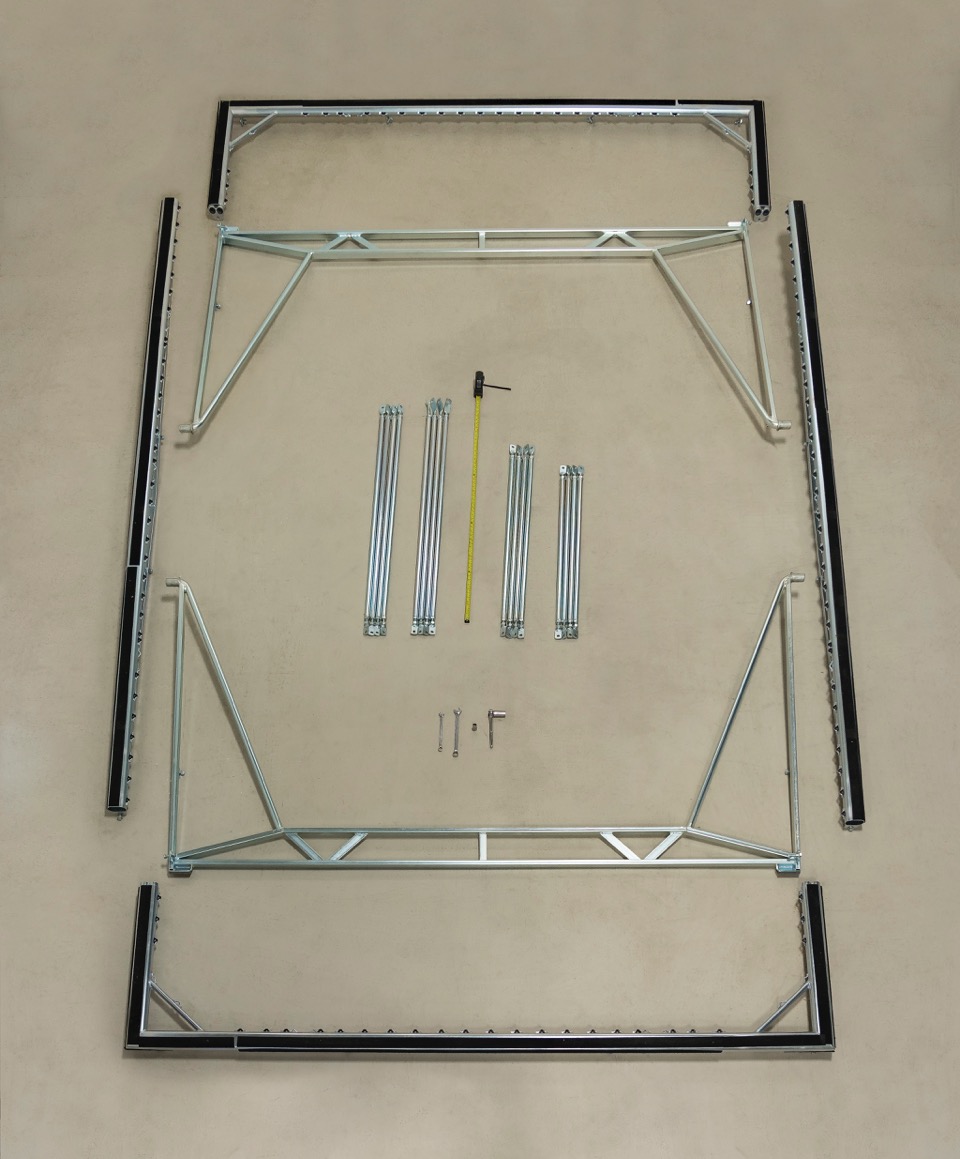
Check to ensure you have all the parts:
|
Frame |
Other |
|
2 – Midsections |
1 – trampoline bed |
|
2 – Legs |
106 – H.P. springs |
|
2 – End Bars |
12 – corner springs |
|
4 – Chain Braces (Longest) |
1 – webbing rectangle |
|
4 – Outer leg braces (straight tabs) |
8 – Frame pad/webbing springs |
|
4 – Inner leg braces (curved tabs) |
10 – pad lifters |
|
4 –Midsection to leg braces (shortest) |
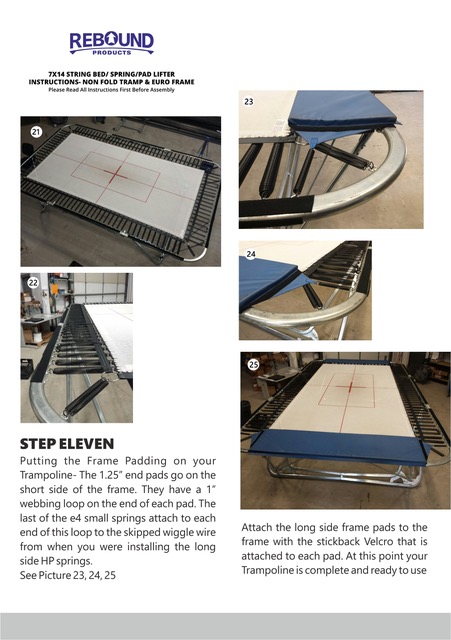
1 – set of frame pads (6 pcs.) |
All frame hardware should be attached to the above parts. For ease of set up, two is the minimum needed, but more makes it faster.
* Having a flat and level surface for assembly, will make levelling the trampoline easier.*
Placing all the frame parts on the floor as shown will make them easy to identify.
A drill driver or good socket wrench with deep sockets and some box wrenches will speed up assembly.
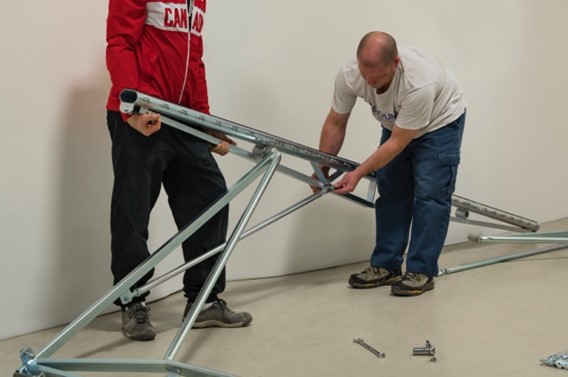
STEP 1) Midsections to legs –
You only need 8 parts for this step. If your layout looks like the photo above, move the end bars outward a couple of feet, and put one chain brace near the leg tops with the keeper nuts towards the centre of the frame. Also note the legs should have the floor protectors facing downward. Remove the end caps from the leg tops (not shown) and place them on the floor outside of the midsections near the leg top insert holes.
A) ADD LEGS – Put both legs into one midsection. If they bind adding a little grease or oil to the leg tops will help. Mostly though getting the correct angle is needed. Then place the end caps (not shown) into the leg tops and finger tighten. Next add the other midsection, and loosely insert the end caps into the other two leg tops.
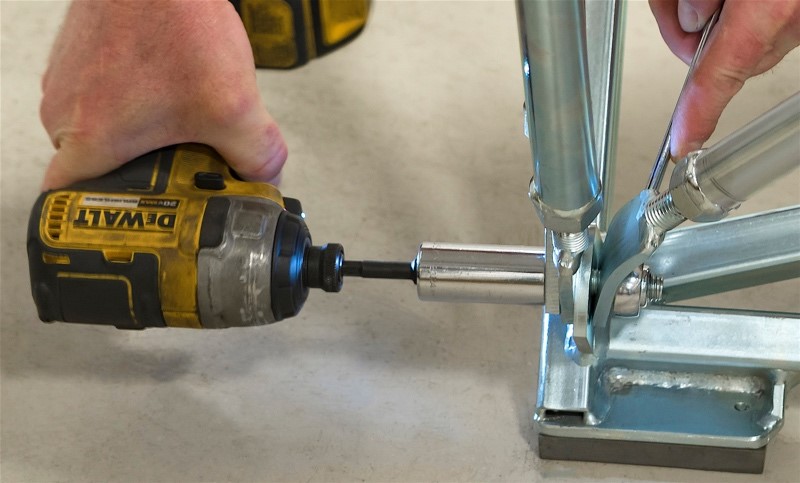
B) ADD CHAIN BRACES – First loosely attach the ends of the chain braces without keeper nuts to their tabs on the legs. From outside to inside the order should be bolt head, leg tab, chain brace tab, then nut. Note all braces should be attached with the keeper nuts facing up, to make adjustments and final locking easier. (Hint: the end of the leg braces without keeper nuts are left hand threaded.) Lift one end of a midsection and bolt the chain brace to the midsection at the holes which are ABOUT 16” from centre, and tighten loosely. Next, do the same for the end of the other midsection that is attached to the same leg. Then the other ends, one at a time, so all 4 chain braces are in place. Now the midsections should be free standing at close to their proper height.
C) LEVEL – Spin the chain braces until all four sides are 45&5/8” from the level surface measured to the wiggle wire. This is a minimum height requirement. Use this number or an equal somewhat higher one. The main importance is to have the trampoline level. Note that as you get close to equal distances from the floor the effect of adjusting one corner on the other will go down. So start by getting all 4 close, before getting too accurate. (Not much interference from side to side.)
When all four sides are equal, tighten the Chain Braces. There is a keeper/locking nut on each brace that will need to be tightened as well. Then tighten the end caps onto the legs.
*It is important to have the midsections level before completing the next step*
STEP 2) Adding 12 braces and 2 end bars –
A) ASSEMBLE – Loosely bolt the 3 braces per corner to the tabs on the legs above the floor protectors. The order should be from the outside of the tramp inwards; bolt head, midsection to leg brace, outer leg brace, leg tab, inner leg brace, nut. Start by adjusting the midsection to leg braces in length so they align with the holes in the tabs at the ends of the midsections. In this way they will be the correct length to not interfere with the midsection levelling. Then flip the end bars upside down with the side portions facing outwards, and loosely attach the top ends of the outer leg braces to the end bars. Then lift one end bar (using 2 or more people) and insert into the midsections.
Bolt these and the midsection to leg braces together. During this operation expect the tabs at the top of the midsection to leg braces to bend. After that remove the nut and fine tune the brace length so that the holes perfectly align. Repeat for the other end. Now the frame will be together but the 4 inner leg braces will not yet be connected to the end bars.
B) LEVEL – Adjust the outer leg braces so the wiggly wire near the corners of the ends are the same height as used in midsection levelling. Then adjust the length of the inner leg braces and attach them to the angled tabs on the end bar. (You may need to fine tune the angle of the leg brace tab. First almost fully tighten the bolt that attaches the 3 leg braces to the leg. Then apply a bit of force so the top end of the brace aligns with the tab. This will be adusting the angle of the bend of the bent tab near the floor.) Finally, tighten all bolts, to include finally the brace keeper/locking nuts on all 12 braces.
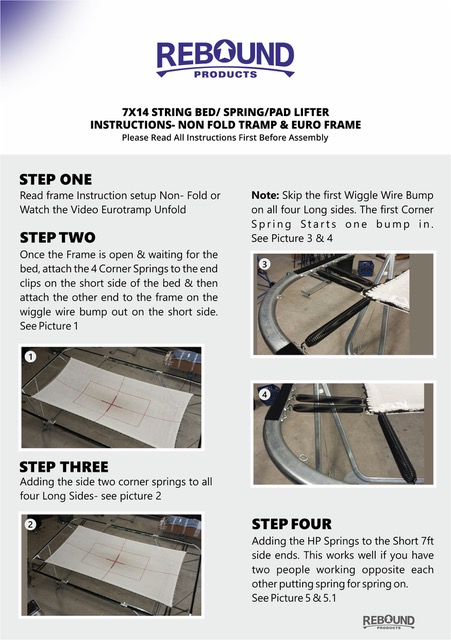
STEP 3) Installing the String Bed with springs and inner extenders.
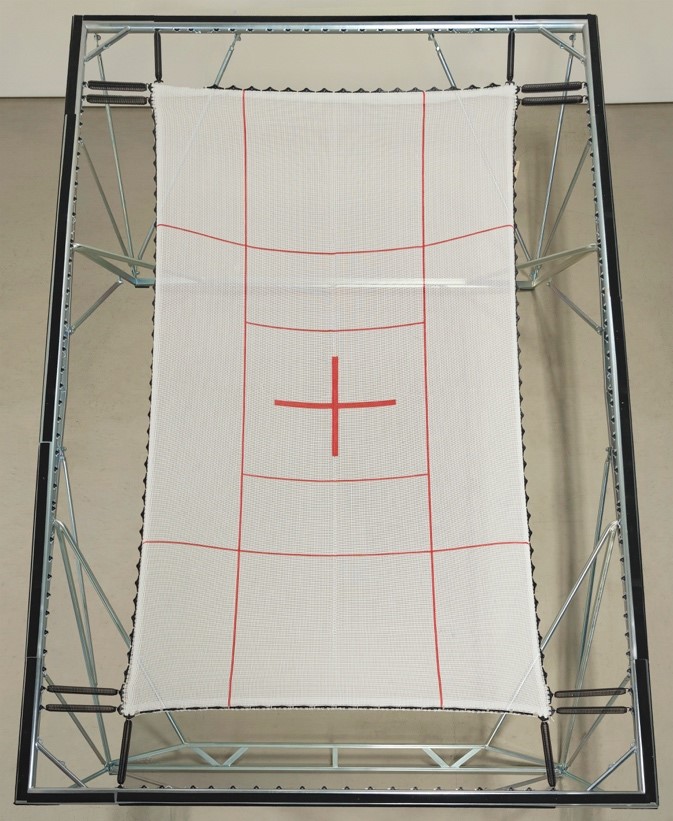
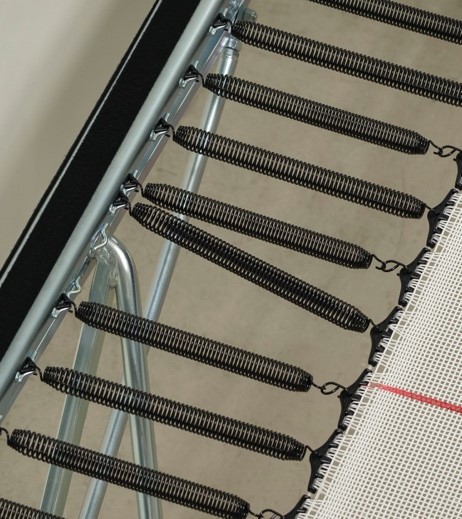
A) CORNER SPRINGS- Attach the 8 corner-most springs first using corner springs (see step 2), on the ends of the bed, and adjust the border rope so that the knot at the end of the rope is lined up with the end of the last spring clip. Then do the same for the sides. Note that the ropes on the long sides of the bed are about two inches longer than the bed in order to accommodate the initial stretching of the bed in this direction. So also move the corner-most bed clip on the sides to the have the knot at the end of the clip. After all of the end springs are attached the side clips should be spread out evenly along the side ropes before attaching the springs. – The twelve (12) corner springs are placed as shown. Do not put corner springs elsewhere on the bed as they will give the bed a hard bottom, and the corners will be less stable. The corner springs are the longer fatter springs. IT IS CRUCIAL TO USE CORNER SPRINGS with your performance springs as shown, OTHERWISE the corners will be soft and AN ATHLETE who lands in the corner or very near the edge of the bed MIGHT FALL OFF.
B) EXTENDERS – If you have all new equipment one inner extender should be used on every second spring. These are placed between the bed and the springs. None should be used on the corner-most (corner) springs. Note that under normal use the bed will increase in size, slightly and the paint will wear in during the first couple weeks under tension. Also the springs will lose some of tension during the first forty 40 hours of use with heavy or powerful athletes. It is normal that a brand new bed will feel a bit tight. After a few months of use some extenders should be removed. The equipment is designed so that all of the inner extenders need only be removed after a few years. This allows an ideal bounce for a long time, and the addition or removal of inner extenders allows individual users to adjust tension to their preference. For ease of assembly put the inner extenders on the bed and hang the springs on either the bed clips or the inner extenders, before pulling to the frame.
C) END SPRINGS –Important! When attaching springs DO NOT to get too far ahead on one side past the other. This makes stretching the second (behind) side harder. (Don’t worry about the springs they are made to stretch much further.) Install the remaining springs on the ends. Working with partners opposite each other works well.
D) SIDE SPRINGS – Align the side bed clips on the border rope. Then put the rest of the springs on the sides. Again working with a partner gives easy balance. When you get near the hinges put the springs where the frame clips are. Expect that one spring near the hinge will be angled. This is planned to avoid leg contact. The other attachment points are for pad lifters.
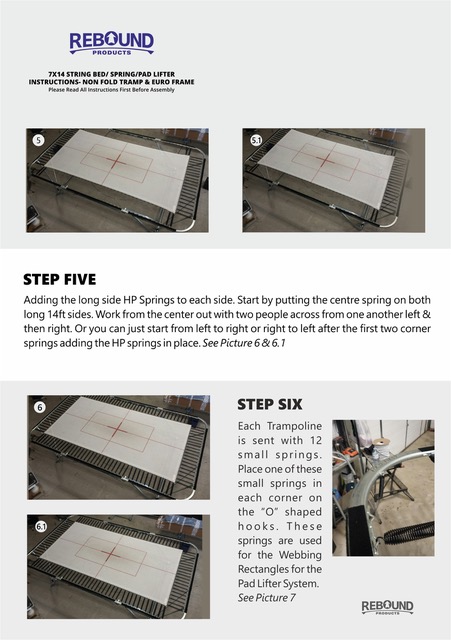
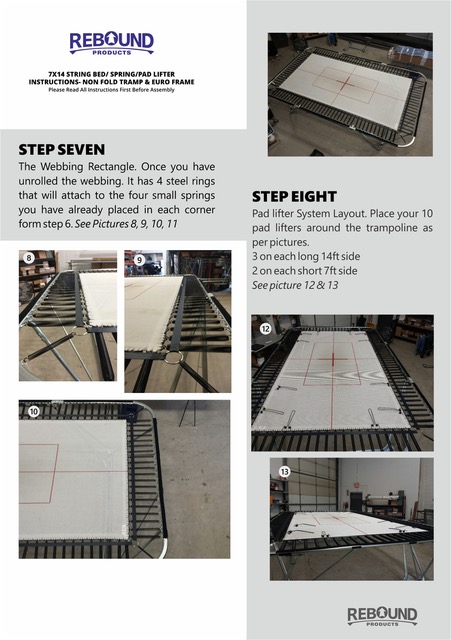
STEP 4) Installing the webbing rectangle and the Frame Pads Lifters.
Lay the webbing rectangle out on the bed or the springs, and attach to the corners with two webbing rectangle springs in series (or one trampoline spring) for now at each corner. This will make pad lifters easier to install.
The 10 pad lifters are placed with 2 per end and 3 per side in specific special frame attachment points. These are easily identified as they are a bit lower than the spring attachment points, and do not have frame clips pre-installed on them. Each lifter is first placed to straddle the webbing of the webbing rectangle with the rounded end towards the bed and the curved sharp ends facing down. Then as the pad lifter is lifted up for installation into the two attachment places, pull the webbing low on the lifter towards the frame. After the ends go into the holes, rotate the lifter down so the sharp ends move under the frame.
After all the lifters are in place, reduce the springs in each corner of the webbing rectangle to one. Note that when you get to the final two corners you should pull the ring in the corner of the webbing rectangle outward with one hand so the springs are not over-stretch during assembly.
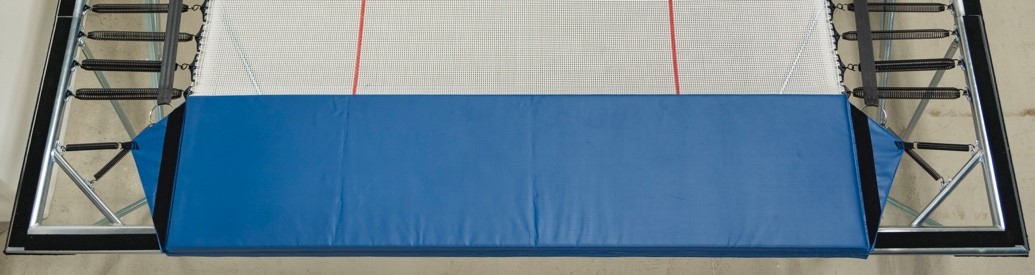
STEP 5) Installing the frame pads.
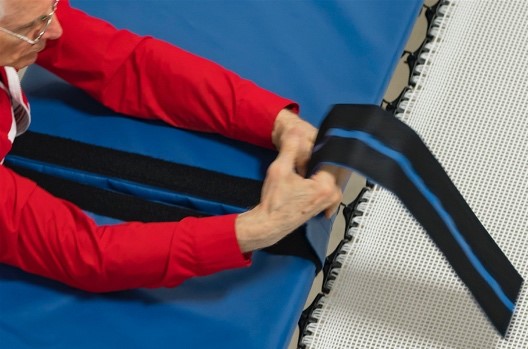
In the pictures above show the Velcro already installed on the frame. This is normally done as the final step. All the adhesive Velcro for the frame is attached to the frame pads. This should be removed and stuck onto the frame in such a way that it will align with the Velcro sewn on the frame pads. Once the Velcro is on the frame, you want to install the end pads first. They attach to the frame with a spring at each end. If those springs are attached while the end pad is pulled forwards over the springs, then the equal tensions of the two springs can be used to centre the pad on the frame. Ideally the frame pads should extend just slightly past the frame tubing. Next is the side pads, then the tabs on the ends of the side pads. The final step is the Velcro joins to hold the two side pad parts together.